
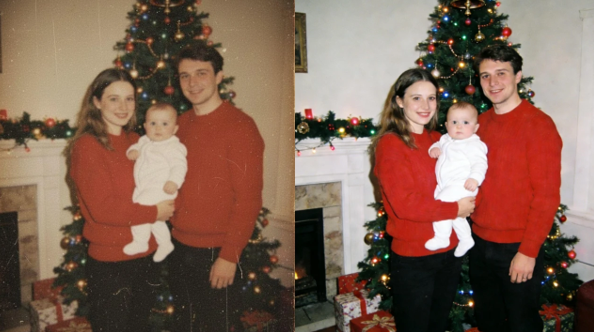
You probably have a box of old photos tucked away in a closet or an attic. These pictures hold memories of grandparents, old homes, and childhood moments that you cannot replace. Over time, physical prints fade, get scratched, or lose their original luster. AI tools now let you bring these memories back to life with just a few clicks on your computer. You can make them look sharp and add realistic colors that make the past feel like the present.
The first thing you need is a high quality digital version of your photo. You can use a standard flatbed scanner or even your smartphone camera. If you use a phone, make sure you have steady hands and plenty of natural light. Shadows or glares on the surface of the photo will make the restoration process much harder later on. Clean the glass on your scanner or the lens on your phone before you start to avoid adding new dust to the image.
Once you have your digital file, it is time to fix the resolution and clarity. Most old photos are small and lack the fine detail we expect from modern cameras. When you try to print them in a larger size, they often look pixelated or blurry. Using a Free Image Upscaler is the best way to solve this problem quickly. This tool uses artificial intelligence to look at the existing pixels and predict what the missing ones should look like. It adds clarity to eyes, hair, and clothing textures without making the photo look fake.
After making the image sharp, you can focus on the colors. Black and white photos are classic, but adding color provides a new layer of reality that helps you connect with the subject. You can use an AI Photo Colorizer to bring life back to those old scenes. The software recognizes objects like trees, skin, and clothing and applies natural looking colors based on millions of reference images. This process turns a cold black and white image into something that feels warm and modern.
Restoring photos used to take hours of manual work in expensive software. Now, the process is broken down into simple steps that anyone can follow. You do not need to be a professional editor to get great results. By following a specific workflow, you can ensure your family history is preserved for the next generation.
Step-by-step guide to photo restoration
Step 1: Prepare and Scan Your Original Photo
Start by cleaning the physical photo with a soft, dry cloth. Do not use water or cleaning chemicals as these can ruin the delicate paper. Place the photo on your scanner and set the resolution to at least 300 DPI. If the photo is very small, like a wallet sized print, use 600 DPI or higher. Save the file as a PNG or TIFF to keep as much detail as possible. Avoid using JPEG at this stage because it compresses the image and loses quality.
Step 2: Repair Physical Damage
Before you upscale or colorize, you should fix any major rips or large dust spots. Many basic photo apps have a healing brush or a spot removal tool. Use these to gently click on scratches or white spots caused by dust. You do not need to make it perfect yet. The AI tools will help smooth out some of the smaller imperfections in the next steps.
Step 3: Increase resolution with AI
Upload your cleaned scan to an AI upscaler. Choose a setting that doubles or quadruples the size of the image. The AI will analyze the grain of the film and try to separate it from the actual details of the person or landscape. This step is vital because it provides a better canvas for the colorization process. A higher resolution image allows the color algorithms to map shades more accurately to specific objects.
Step 4: Apply Realistic Color
Take your upscaled image and run it through a colorization tool. Most AI colorizers work automatically. They identify the sky, grass, and human skin tones. If the tool allows for adjustments, you can sometimes tweak the intensity of the colors. Look for a balance that feels natural. You want the photo to look like it was taken with a color camera, not like a cartoon.
Step 5: Final Adjustments and Saving
After colorizing, you might notice that the contrast is a bit low or the colors are a little too vibrant. Use a basic photo editor to adjust the brightness and contrast. This helps the photo pop and look more professional. Once you are happy with the result, save a copy in a high quality format. Keep your original scan in a separate folder so you always have the untouched version as a backup.
Tips and best practices
To get the best results, you need to understand how AI interprets your images. The quality of your input directly affects the quality of your output. If you give the AI a blurry, dark scan, it will struggle to find the details.
Scan Settings for Best Results
| Setting | Value | Why It Matters |
| Resolution | 300 to 600 DPI | Provides enough detail for AI to work. |
| File Format | PNG or TIFF | Prevents loss of quality from compression. |
| Color Mode | Grayscale or Color | Color scans of B&W photos capture more depth. |
| Bit Depth | 8-bit or 16-bit | Higher bit depth allows for better color grading. |
Use natural light if you are taking a photo of a photo. Avoid using a flash because it creates a bright white spot in the middle of the image. If you are scanning a photo that is stuck behind glass in a frame, try to remove it carefully. If it is stuck, you will have to deal with reflections, which can be removed later with editing software but it takes a lot of effort.
Always work on a copy of your file. Never overwrite your original scan. You might find a better AI tool in a few years and you will want that original high resolution scan to try again. Technology improves every month, so keeping your raw files is a smart move for the future.
Common mistakes to avoid
One of the biggest mistakes people make is over-processing their photos. It is tempting to turn all the settings up to the maximum. However, this often results in a plastic look. People’s skin might look too smooth, like they are made of wax. Keep the settings moderate to preserve the natural texture of the skin and clothing.
Another mistake is ignoring the background. Sometimes the AI focuses so much on the person in the photo that the background becomes a blurry mess of weird colors. If the background looks wrong, you might need to use a different tool or adjust the color balance manually. Pay attention to the edges where a person meets the background to ensure there are no strange color bleeds.
Comparison of restoration methods
| Feature | AI Restoration | Professional Manual Service |
| Time Required | Minutes | Days or Weeks |
| Cost | Low or Free | High |
| Ease of Use | Very Easy | Requires Expert Skills |
| Consistency | High | Varies by Artist |
Do not skip the cleaning step. If there is a hair on the scanner glass, the AI might think it is a part of the person's face or a branch on a tree. It will try to upscale and colorize that hair, making it much harder to remove later. A quick wipe of the glass saves you twenty minutes of editing later.
Finally, do not expect the AI to know exactly what colors were there. If your grandmother was wearing a blue dress, the AI might guess it was green. If you know the specific colors of the clothes or the house in the photo, you may need to use a manual editor to shift the hues. AI is a tool for guessing, not a time machine.
Conclusion
Restoring old photos is a rewarding way to honor your family history. With AI upscaling and colorizing tools, you can transform grainy, faded prints into vibrant images that look like they were taken yesterday. The process is straightforward and does not require a background in graphic design. By scanning your photos at high resolution, using AI to add clarity, and carefully applying color, you can save your most precious memories from fading away. Start with one or two photos today and see how much detail you can recover from the past. You will be surprised at how much life is hidden in those old black and white squares.
DISCLAIMER – “Views Expressed Disclaimer – The information provided in this content is intended for general informational purposes only and should not be considered financial, investment, legal, tax, or health advice, nor relied upon as a substitute for professional guidance tailored to your personal circumstances. The opinions expressed are solely those of the author and do not necessarily represent the views of any other individual, organization, agency, employer, or company, including NEO CYMED PUBLISHING LIMITED (operating under the name Cyprus-Mail).




Click here to change your cookie preferences